
AWA
Description: Around October 2020, my good friend Fredo (@sci_sic) visited me at Xalapa and we decided (for fun) to start building an automated watering system for 🌱s. Neither of us had (at least up until that point) any real experience with hardware, so apart from the conventional Raspberry Pi set-up, we were delving into terra nova. This was, of course, a great feat for a mid-pandemic activity and I think I speak for both of us when I say that it was a very fruitful learning and it was good to spend some time together starting this project off. Unfortunately, due to our lack of experience (and Fredo’s relatively short stay) we did not manage to finish this project in time before he parted. Luckily for our 🌱s we were both determined on reaching our goal, and even though we opted for slightly different paths, I think we both ended up with something quite interesting. I will try to outline, as succintly as possible, some of the obstacles and learnings we encountered along the way. However, at least regarding the last part of this project, I can only speak for myself… Perhaps Fredo will like to share ther rest of his experience with everyone too some day!
Initial planning
I think one of the hardest bits of this project was to get resources for what we had in mind. 🤔 Actually! (Now that I think of it) I think the hardest bit was to decide what we had in mind; that is, what we actually wanted to achieve 1.
In short I’d say that we were striving for a very simple sytem/architecture that would allow us to water at least one plant, given some inputs from the environment.
To me, one of the best moments during the development of this project was when one morning (rainy, as per usual in Xalapa) Fredo said that the best automated watering system that we could possibly have was the rain itself. I found it funny because it was so simple, yet so true. To me that meant that whatever we were going to build had to be for an indoors setting, although I understand why one would want to have an automated outdoors watering system – it certainly makes a lot of sense if one is thinking in terms of more rigorous, systematic, and measured watering systems for medium-to-large scale production of plants (and all the good that comes from them ;) )
So, evidently, what we wanted was not so hard: it was just a sytem that allowed us to have a simple temperature/humidity measurement from the environment that would trigger (under the right conditions) the watering of one indoors plant.
The requirements
Given a clearer idea of what we wanted, we had a better idea of what to look for, in terms of tools. However, it still was (IMO at least) quite hard to find exactly what/how to use for the project. Unfortunately, in the heat of the moment, I did not pin down all of the useful articles we found to guide us in this adventure. I know, though, that we started looking at things like this one but were rapidly discouraged by the sheer complexity of the set-ups we were finding.
We were getting somewhere though! Eventually we bumped into articles that looked a bit more like this one, with simpler setups and more in-line with what we wanted to achieve.
After diving into a few of those articles we had a brief list of tools we needed:
- Raspberry Pi - we knew these kinds of systems could be done with less powerful and costly boards but we were both fairly familiar with the set-up of a RPi and we wanted to exploit that. Plus, what’s good about the RPis is that you can do multiple things with them at the same time :)
- Charger / MicroSD / Case / etc - Usual stuff for the Raspberry Pi 2.
- A DHT11 sensor - the cheapest and most commont temperature / humidity sensor we could find out there (it was also probably the most mentioned one).
- An ESP8266 ES-01 module - this was, in the end, a bit of a detour but it was definitely worth considering, especially since we wanted to keep the RPi far away from the rest of the system.
- A solar panel - of course! Because whay the hell not!? 🤷♂️ This was also a detour 🤦♂️ 3
- A water tank - self-explanatory.
- A water pump - also pretty self-explanatory.
- A relay - to control the water pump.
A note on the ESP8266 ES-01 detour:
By all means, I think this module is actually really helpful. Initially, what we wanted to do was something like this:
┌───────┐
│ Dht11 │
└───────┘                         ┌─────┐
    ▲                             │Solar│
    │                             │Panel│
    │                             └─────┘
    │                               ▲
    │                               │
 ┌──┴──┐                       ┌────┴──┐
 │ RPi ├───► xxxxxxxxxxxxxxx   │ Relay │
 └─────┘                       └────┬──┘
                   WiFi             │
                                    │
                                    ▼
                               ┌────────────┐
                               │ Pump & Tank│
                               └────────────┘
Or to see it in a more visually-friendly way:
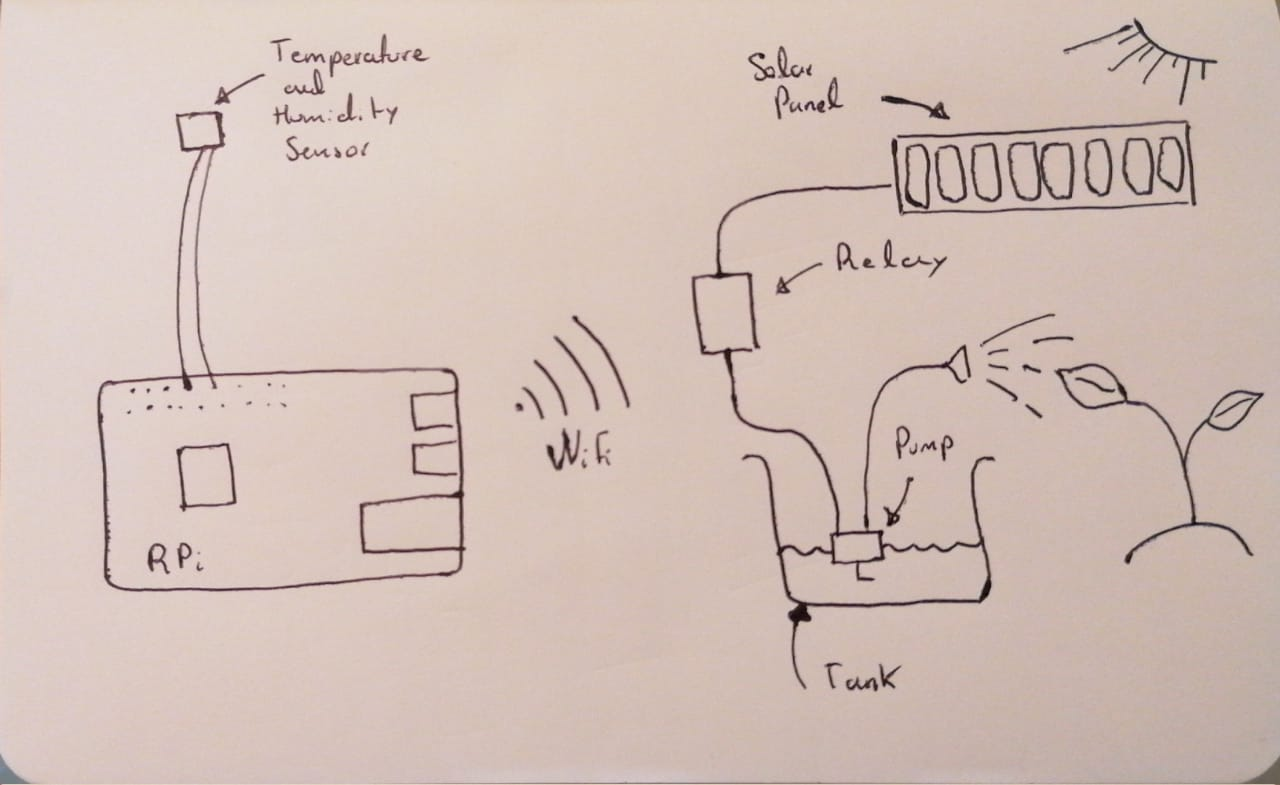
This was an ideal architecture because, as I said, we wanted to have the RPi on a separate place and control the relay via WiFi. However, configuring the module and making sure it worked was harder than we thought, especially given that we wanted to power it with solar… At first we used the ESP8266 ES-01 model, which we were not able to successfully put together because we were missing a USB adapter, but at this point we were really anxious to get this going so we bought a ESP8266 Lua WiFi with CP2102 (v1.0) at a local store and we actually did manage to use that without the solar!
It was a lot easier to upload the code there, and we even managed to set an HTTP endpoint to control the relay:

However, at this point the set-up of that module was becoming a bit obtuse and I decided to leave it out, meaning that the RPi would have to be relatively close to the relay and the rest of the system in order for it to work. That is, the would be no remote control through WiFi, although I must admit this is a really cool thing to have both in terms of keeping the RPi safe and isolated from the rest of the system and in terms of reach.
The final architecture
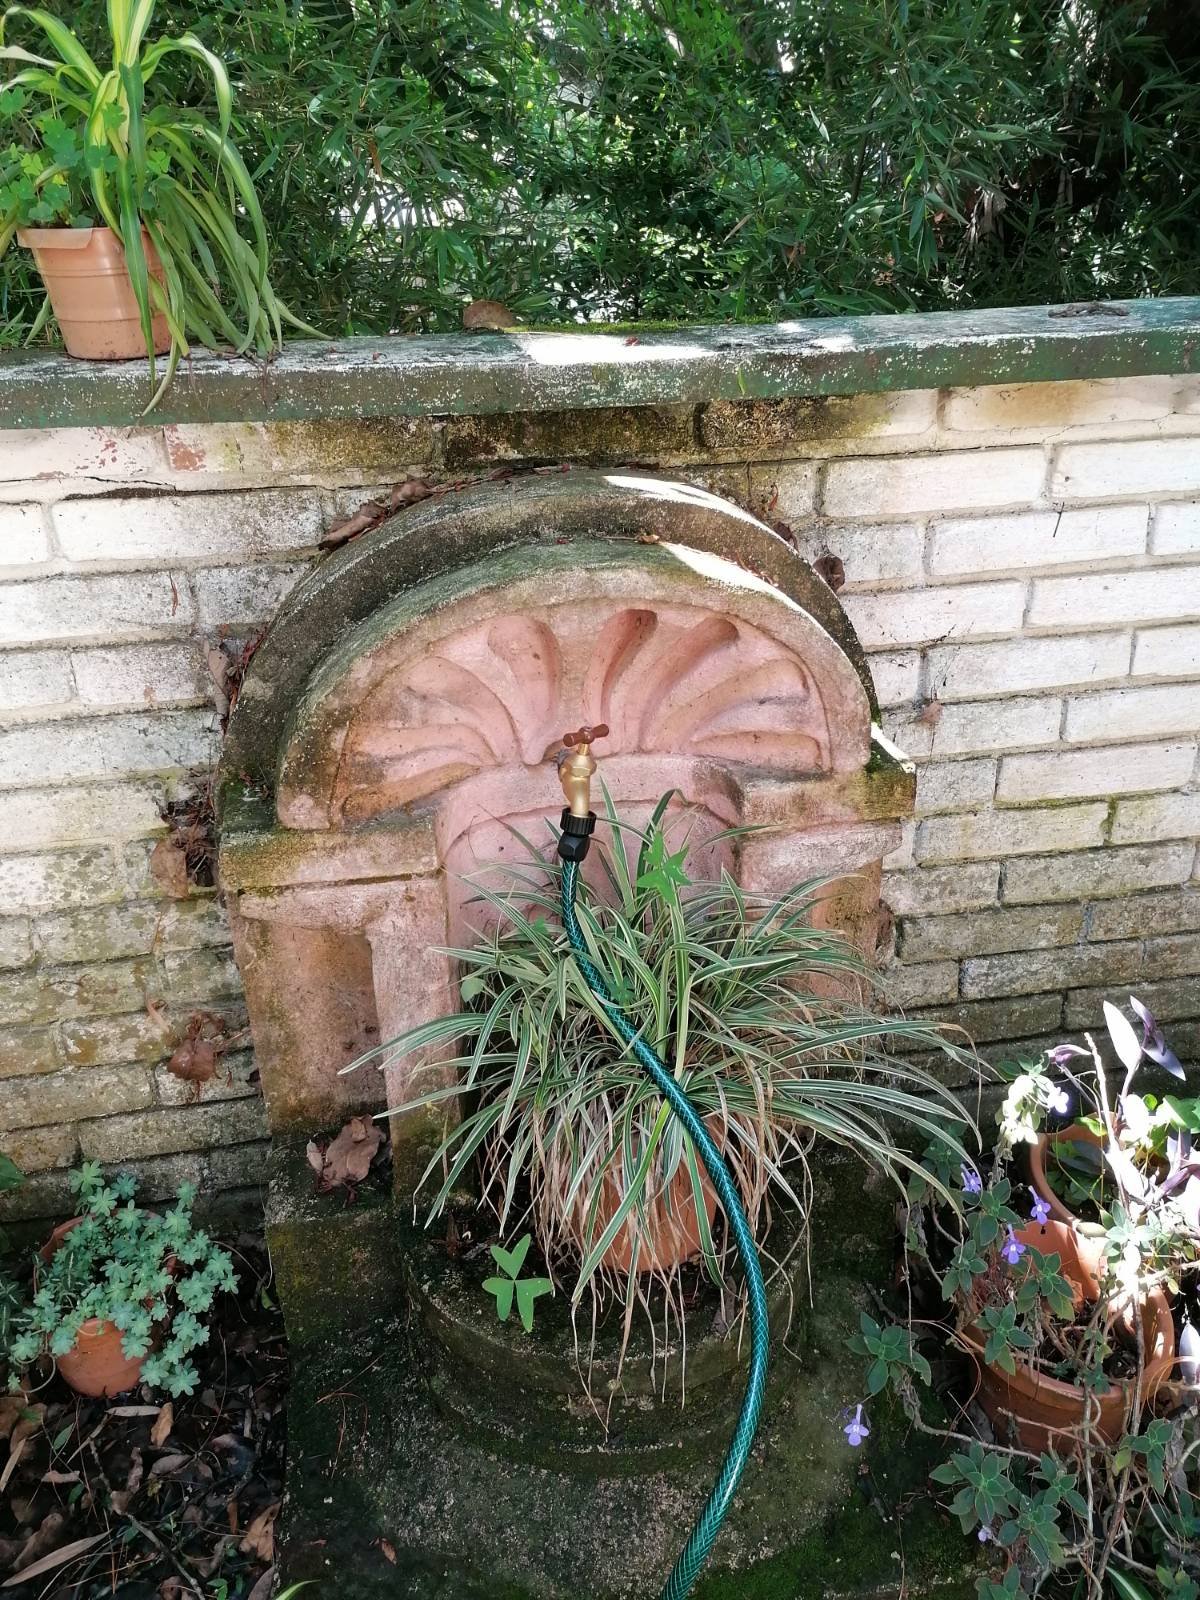
After our little detour, and once Fredo had already gone, I bumped into an uncle of mine (Abel) that I knew would be interested in this project. When I started describing the system to him he said something very true: instead of using a water-pump we could leverage the power of gravity to dispense the water. I found that to be a really elegant and energy-efficient way to design the system and so the project took a turn towards that. However, shortly after that, I found a perfect water source right next to my house that was enough for me to decide not to go buy the water tank anymore:
In any case, what this meant was that instead of having a water-pump we would use a solenoid valve, which would be controlled by the relay.
The final architecture would, thus, look like this:
┌───────┐
│ Dht11 │              ┌───────┐
└───────┘              │12V    │
    ▲                  │Power  │
    │                  │ Supply│
    │                  └───────┘
    │                    ▲
    │                    │
 ┌──┴──┐            ┌────┴──┐
 │ RPi ├───────────►│ Relay │
 └─────┘            └────┬──┘
                         │
                         │
                         ▼
                    ┌────────────┐
                    │Valve & Tank│
                    └────────────┘
In terms of resources this meant that we also needed the following:
- A water source and a hose.
- A set of relays. See this, for example.
- A 12V power source for the solenoid valve. See this one, for example.
- A solenoid valve. See this, for example.
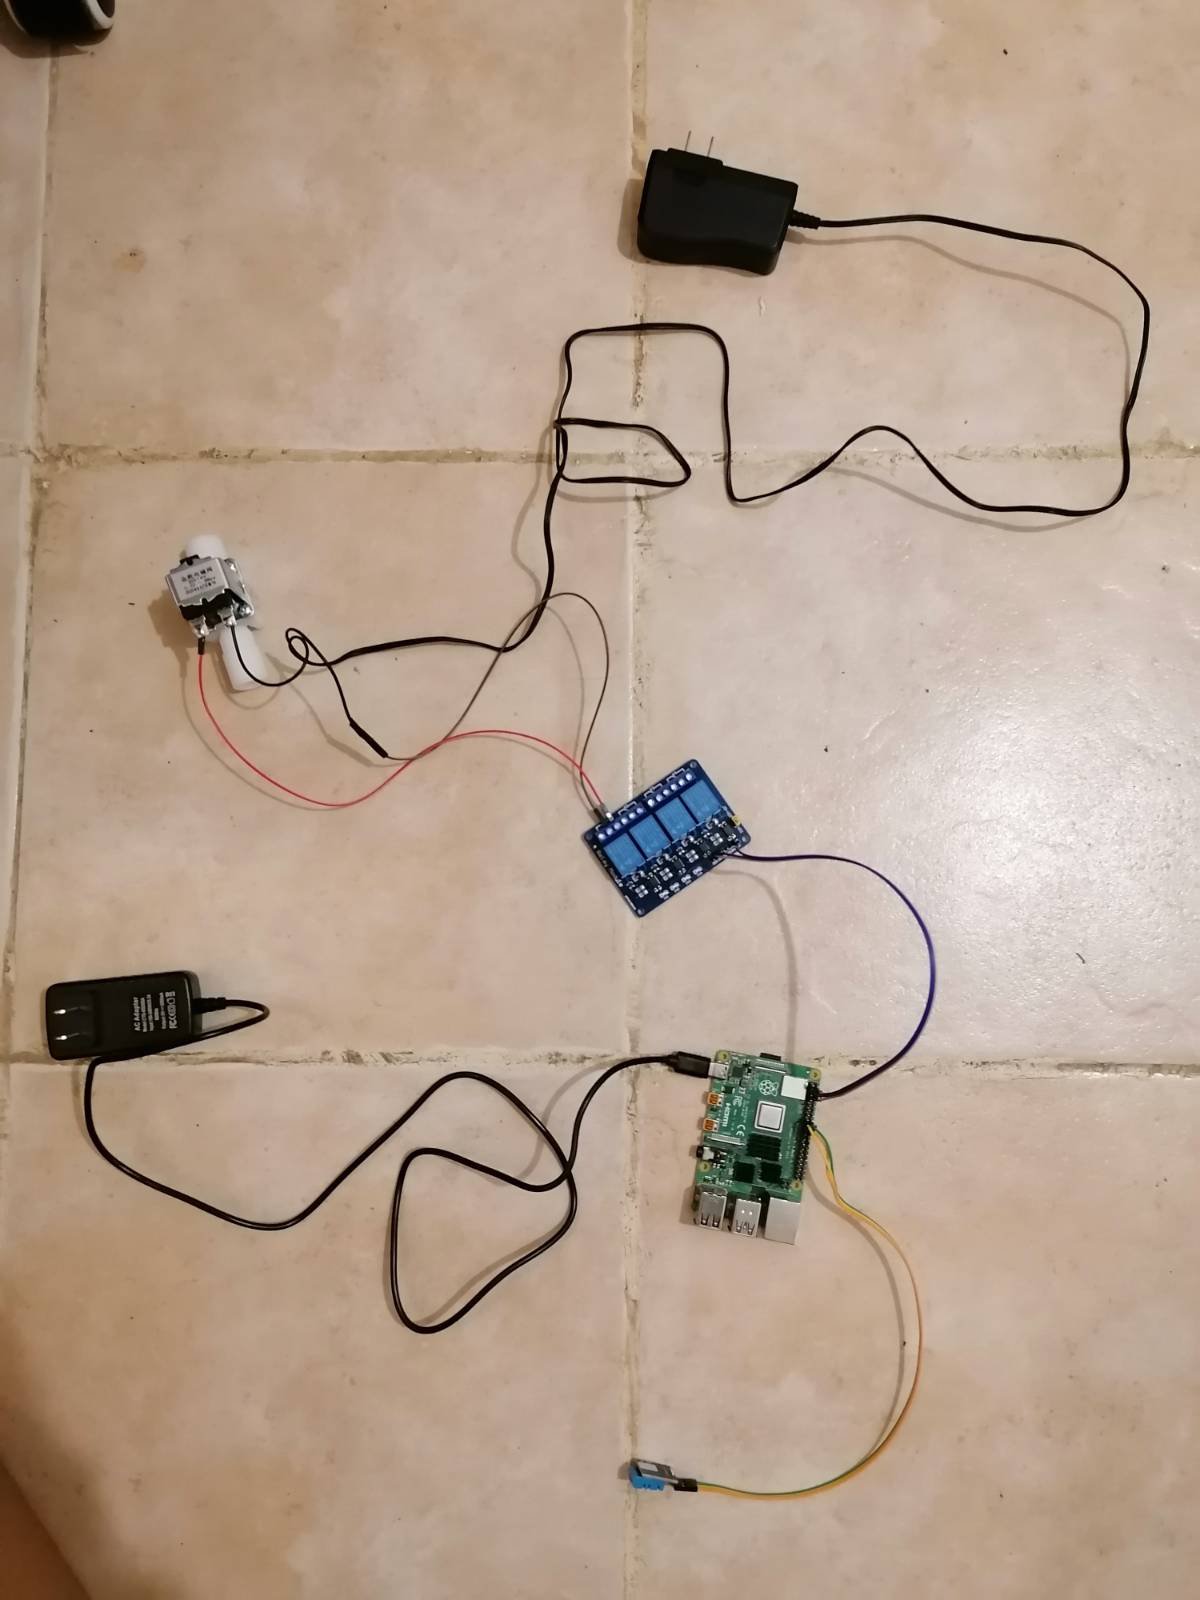
Final set-up:
At this point it was just a matter of wiring things up. For that a really cool resource is the Raspberry Pi Pintout. One could think of this last set-up in terms of two main blocks: the connection from the DHT11 sensor to the RPi and the connection from the RPi to the relay and the solenoid valve…
DHT11 to RPi
This was a very simple set-up. Depending on the type of DHT11 the pinout of sensor could be different, but what’s important is that in terms of the connection with the RPi, one needs to have the VCC connected to the 3V3 pin, ground to ground and the signal to one of the GPIO pins.
RPi to relay and solenoid valve
Connecting the RPi to the relay was a bit more complicated. The thing about it is that the solenoid valve is that it needs a 12V power source and if one wants to isolate the RPi from that voltage level one should use a set of relays this. Connecting those relays to the RPi is almost the same as connecting the DHT11, except for the fact that the VCC goes to the 5V pin.
Once we had that sorted out we needed to strip some wires to connect the solenoid valve to the set of relays and the 12V power source. All in all, this is what it looked like (without the water tank):
The code
The code that is being used currently can be found in this repository. It’s a very simple script that takes care of initializing the sensor and the valve at the correct pins, take the temperature and humidity readings and decide (based on a few parameters) whether to water the plant (for a few seconds) or not every pre-determined period of time. All of these parameters (pins, delay, watering time) can be adjusted to fit the specific 🌱s one would like to water!
A note on the thermal control of the RPi:
Depending on which type of Raspberry Pi is used one could need to control for the heat generated by it. Raspberry Pi 4 get warm quite easily and it’s worth considering getting a fan for it. The problem is that fans are very noisy and this could be quite annoying. So regarding thermal control of the RPi I would recommend a flric case which is absolutely noiseless, keeps the RPi cool, and it also looks nice :sunglasses:.
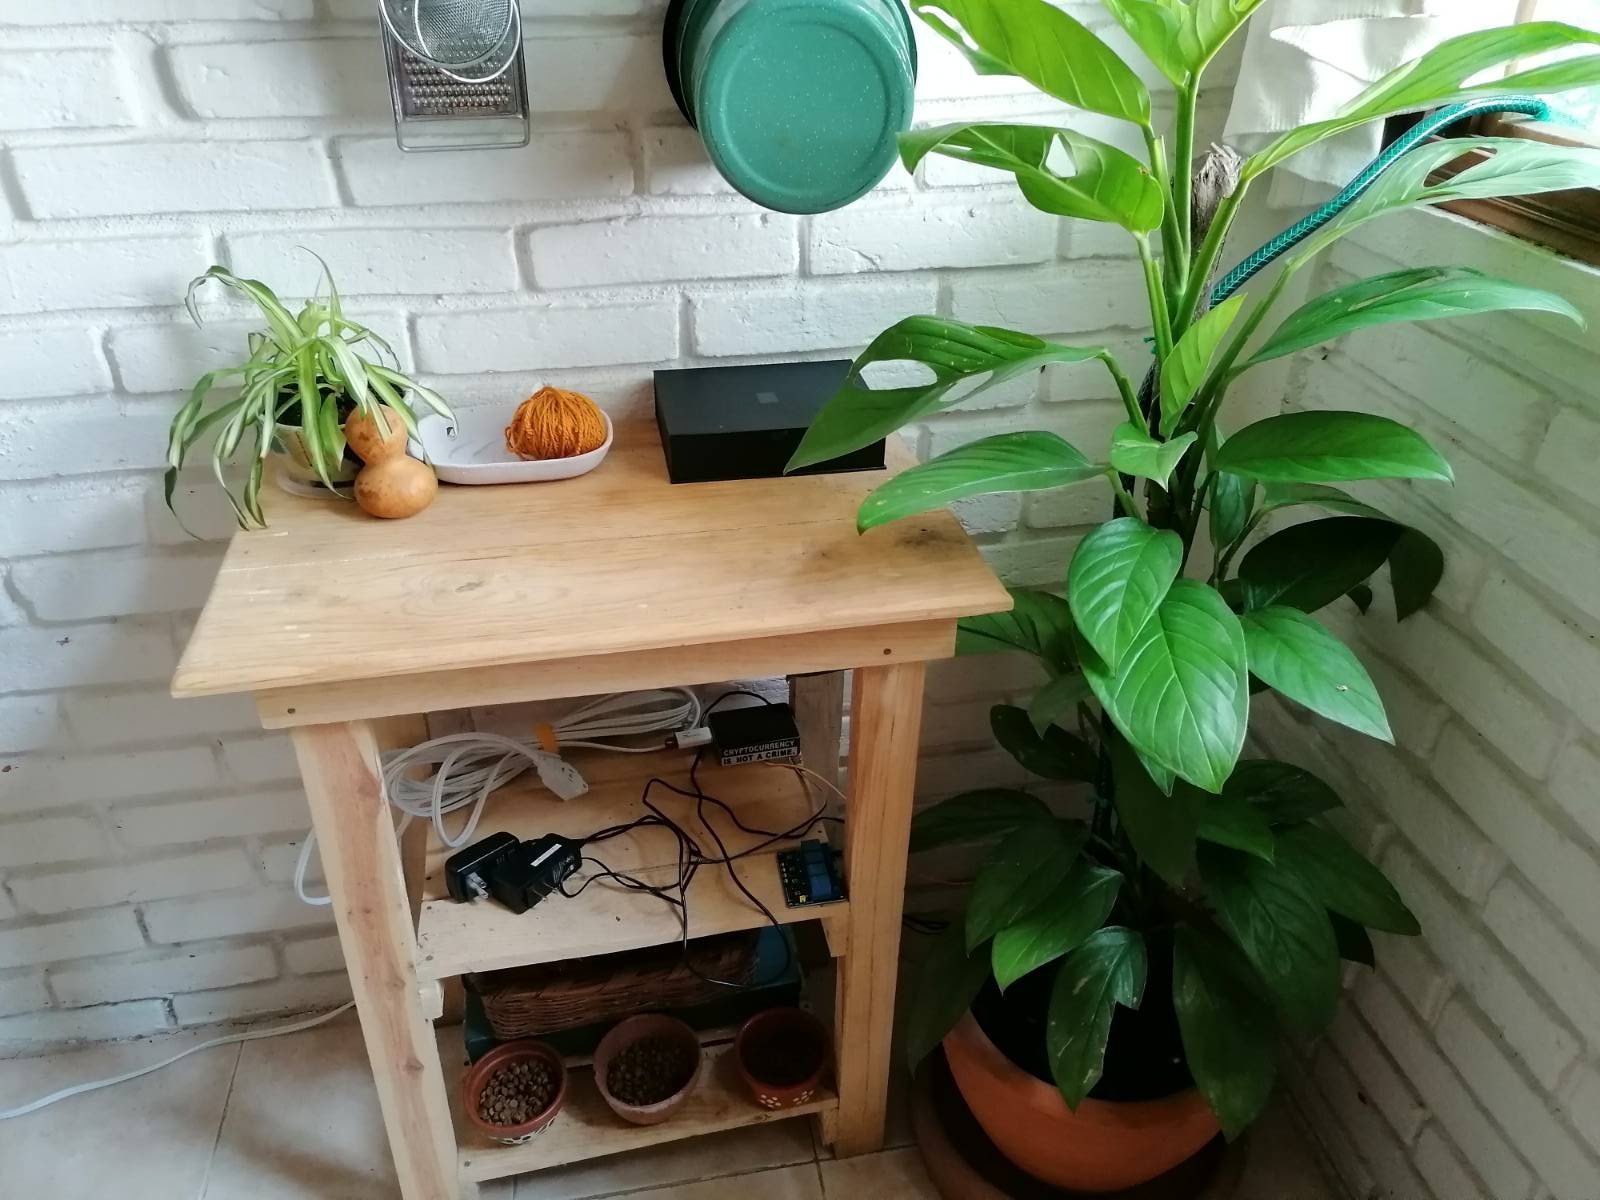
Result:
Here are a couple of pictures of the full set-up and the happy 🌱:
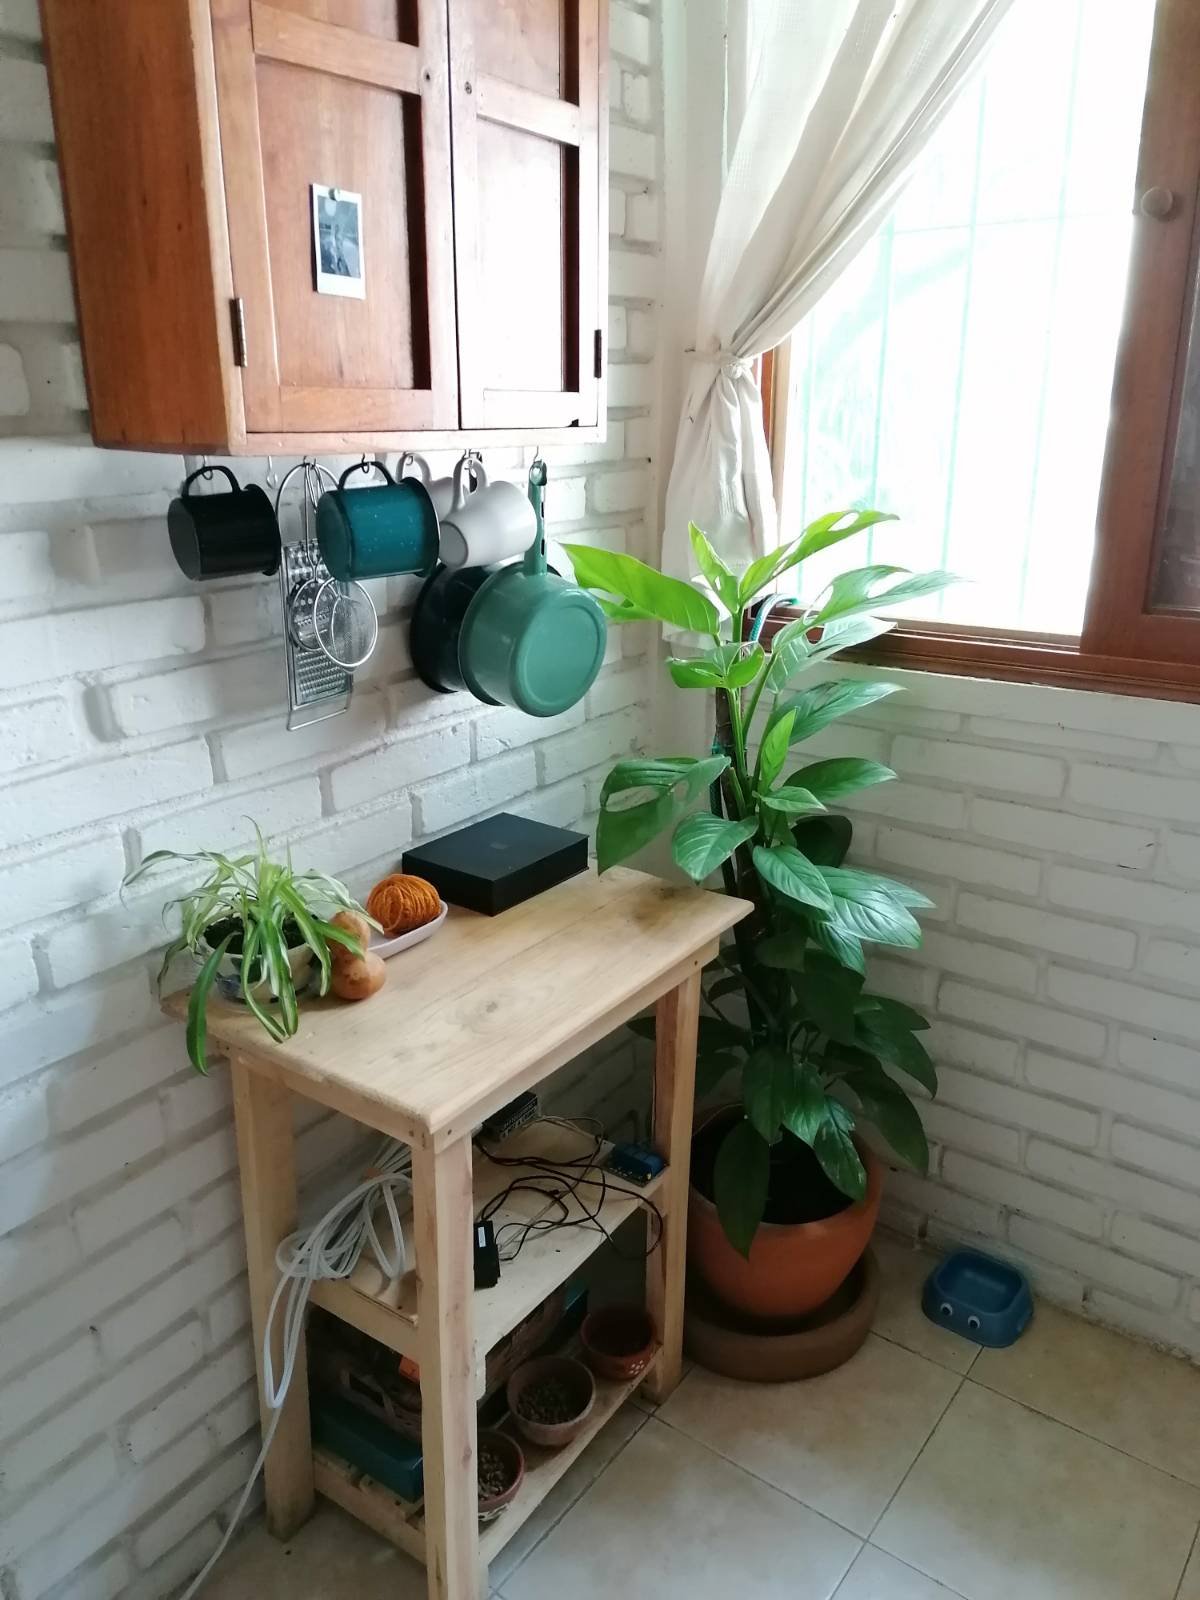
🍀
-
Since the very beginning I was quite clear on the idea of doing this with Rust, given that I was (am!) trying to become more literate on it. I think this wasn’t on Alfredo’s top priorities, but, looking back, I’m glad I started writing some of the code on Rust. It was quite a challenge to compile the program on a Raspberry Pi but I ultimately managed to do it :) ↩
-
For a headless set-up we initially followed this blog post but, later on I decided to use Ubuntu instead of Raspbian, and for that I followed this other one. ↩
-
To be fair I think both Fredo and I would agree that a solar panel is cool as fuck and it’s actually a good idea but we were just not savvy enough for us to get it working properly ☹️ ↩